Alliums are a quite large genus that are often two fold, allium describes the plant’s genus, a category of similar plants, while also describing the root vegetables you can get from the allium genus as well.
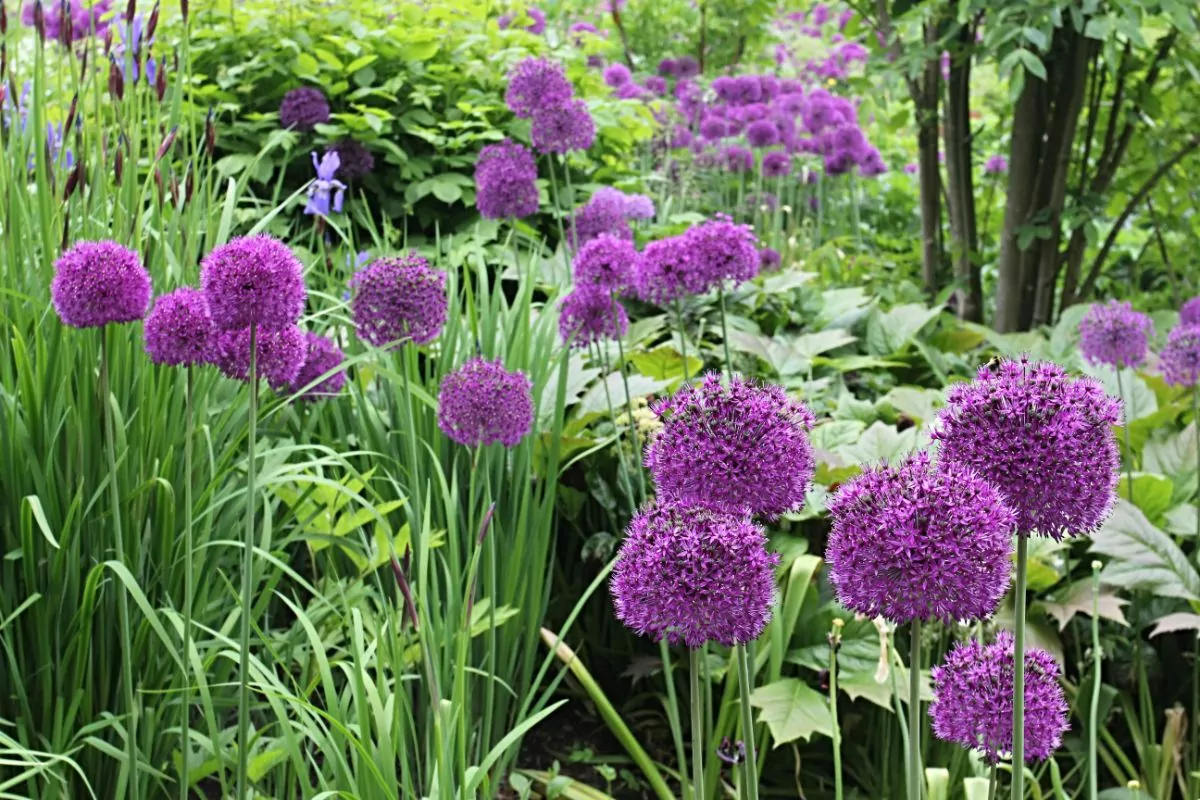
There are some really popular ornamental alliums such as ‘Purple Sensation; which can be seen in many people’s gardens during the temperate spring.
This in part points to why alliums are great to grow, depending on the variety of allium you are growing you can either have an ornamental plant that shows off the allium’s unique flower, or you can rely on the seeds to create onion, garlic, or any other allium for food use.
In either situation, once you have one allium plant you can begin to collect the seeds of the allium plant, allowing you to grow more ornamental or food producing plants as and when you wish.
Regardless, growing from seeds, the benefits of doing so, what you can gain from growing from seeds, as well as general information about growing alliums, will all be discussed in this article, and more.
So, keep reading to learn more about gardening as well as how to grow from seed.
What Are Alliums?
Allium is quite a common term that gets thrown around in different contexts and can mean different things. Objectively, the term allium describes a genus of flowers in the Amaryllidaceae family.
They are flowering plants, many of which grow root vegetables in the soil such as garlic, onions, chives, leeks, green onions and more.
As a result, in the kitchen, if someone says ‘allium’ it often refers to one of these types of vegetables which come from an allium plant.
Generally, all allium vegetables, garlic and onion, etc, can generally be ascribed as ‘onion-y’ and if any vegetable is ‘onion-y’ it’s generally called and recognized botanically as an allium.
The master of botany Carl Linnaeus was the first to describe the Allium family in 1753. Many believe the term allium comes from the Greek ‘aleo’ meaning ‘to avoid’.
Partly due to the smell of onion and garlic, but maybe also to do with what would’ve been a n unidentified issue with certain animals finding alliums poisonous. That said, nearly all allium species are poisonous to dogs and cats in some form.
Yet, we did mention that most alliums are flowering as well as food producing. In many cases, people may grow alliums in their garden purely for ornamental purposes.
Most alliums have similar flowers, and certain alliums are actually quite pretty. As a result certain cultivars of the allium family are grown purely for show or ornamental reasons.
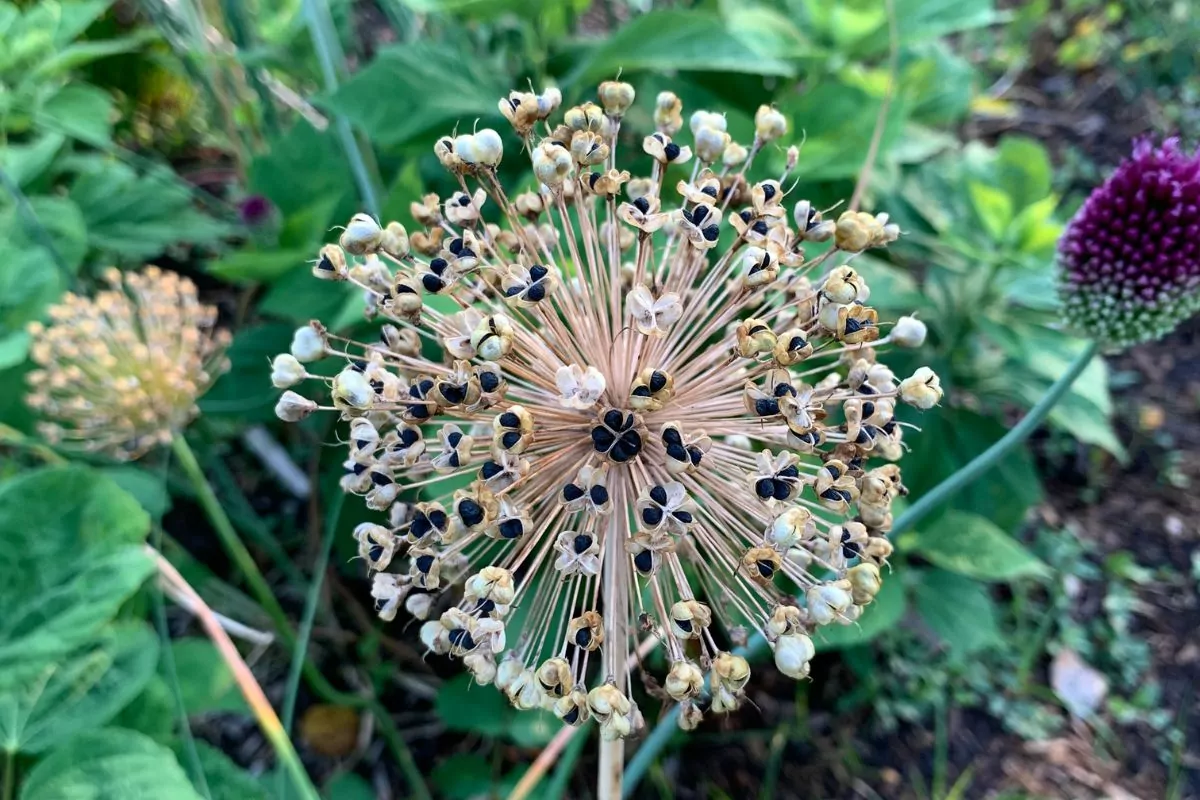
As a result of their flowering head, alliums will naturally produce seeds near the end of their flowering period. We can harvest or collect these seeds and in the following season we can plant the seeds so we can grow the allium from seed rather than planting a young form of the plant.
If you live in the temperate Northern hemisphere, such as North America or the UK, you will find alliums everywhere, as the species are endemic to the temperate climates of the Northern hemisphere, meaning they grow pretty widely and easily in the climate of the
Northern hemisphere, and may even occur in the wild of certain areas. As a result it can be fairly easy to grow alliums from seed or from younger forms.
When To Collect Allium Seeds?
Most plants that are flowering, although not all, wil produce seeds in the final stage of the flowering process. There are a few ways you can collect seeds, much of which can depend on how and when you harvest them, but it’s generally pretty easy with a little common sense.
If you have an allium plant already you can simply harvest this when it finishes blooming and you will be able to plant way more next season.
Most alliums will bloom in early spring, similar to when tulips and daffodils come out. Often alliums are one of the first plants to appear as winter turns to spring.
After this blooming period, the foliage will die back and the seed heads will dry; this will likely occur as the season closes in, in mid to late summer.
The main goal here is to let the seeds mature on the plan and collect them when they are dried and ready to fall. When you reach this point they should be coming off the flower heard anyway.
On an immature flower head the seeds will begin to form and will generally be green, a sign of their immaturity.
A flower head will naturally turn into a seed head when mature. These dried seed heads will bear dried seed heads which are much darker, this is ideally when we want to harvest them.
Put simply, harvest when mature and dried, not while the flower is still in bloom. If you don’t harvest the allium’s seeds they will naturally disperse as nature intends, and may incidentally seed themselves anyway.
Harvesting these seeds before they disperse gives you more control on where the plant grows.
What Do You Need To Collect Allium Seeds?
There are a few tools and things you may want to have handy to make it as easy and organized as possible.
Of course, when collecting seeds things can end up mislabelled or not packaged correctly leading to mistakes and lost seeds, which you may have to wait for a whole year to rectify properly.
In any case, it will be worthwhile to have a paper bag or container, paper bags are often best to help keep them aired out and free from mold, as well as a pair of secateurs for easy harvesting.
One thing many people will forget is to have some labeling equipment to ensure you are marking each packet or container of seeds you collect.
Believe me, if you don’t label your seeds good luck trying to figure what they are when the next season rolls around.
Moreover, be specific with your labels, as you may be harvesting more than one allium for example, so it can be good to also note the variety of allium or at least their color.
How To Collect Allium Seeds?
Harvesting the seeds can arguably be the easiest part of the process, should you have everything set up already.
First things first, make sure you are harvesting on a dry day. Considering you will harvest seeds in mid to late summer this shouldn’t be a worry, but you want dry seeds, and if it’s raining they will get wet and begin to germinate.
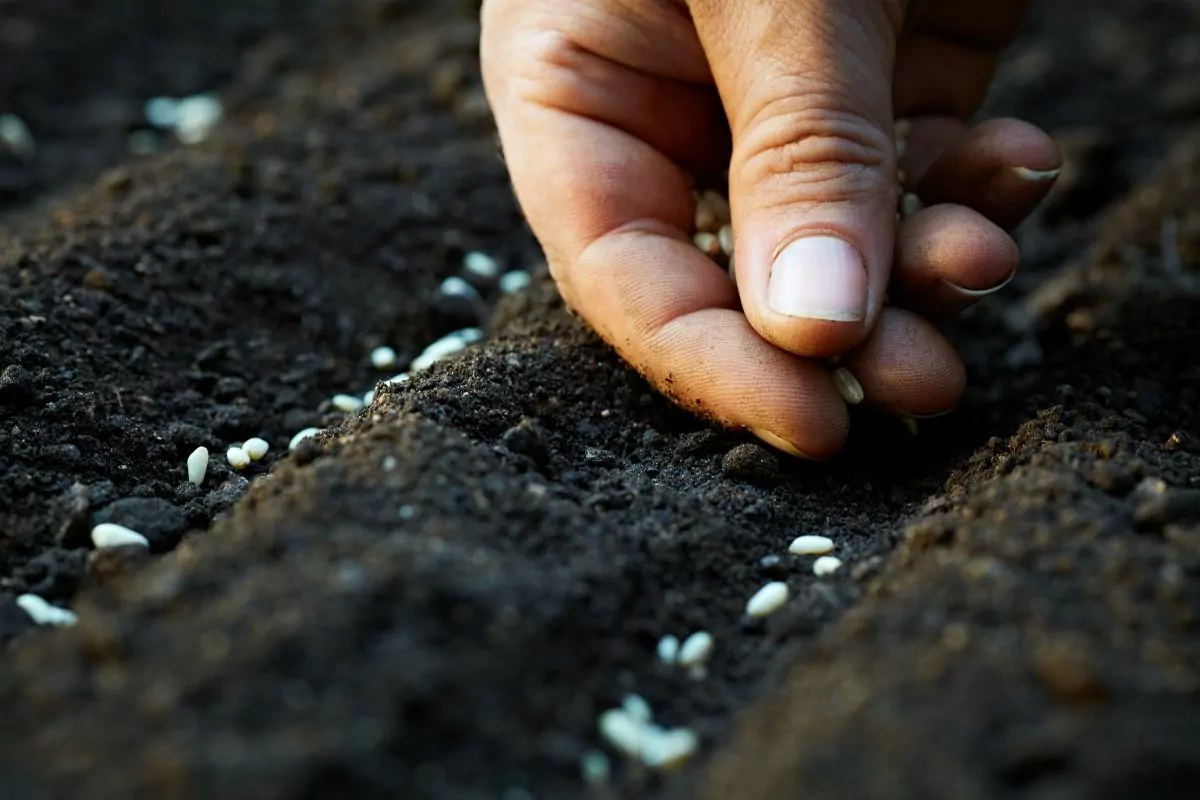
To harvest simply get your secateurs and snip under the seed head. With the now detached seed head simply turn it upside down on a surface, or over your bag or container, and give it a little shake.
You should notice seeds naturally coming off the plant and falling into whatever container or surface you are using. You can attempt to sort the seeds from the husks and other plant parts, but it’s not always necessary.
Once you have harvested a decent amount of seeds, around a handful will likely be enough but harvest as many as you wish, you should label them immediately while you still remember.
Mark the bag or container with the name of the plant you harvested, be as specific as variety or cultivar for accuracy, as well as the date harvested.
Recording the date will let you know if the seeds are fresh and, if they are misplaced, if they are still usable or not. It is best to use the seeds you harvest now, in the next season, if possible.
How To Store Seeds?
Depending on how you collect them originally in a paper bag or envelope, it can be best to store seeds in airtight containers, especially if you want them to last for a long time. The general rule to remember with storing seeds is dry and cool.
Often, people will collect seeds in envelopes, seal them, and then store those envelopes in some kind of airtight container like a piece of tupperware or even a mason jar. Keep these in your refrigerator to keep them fresh and free from mold.
Do Allium Seeds Need Stratification?
Cold stratification can be a really good way to help boost the growing success of your seeds. It’s easy to do and is a little bit of preparation that will ensure you have seeds ready to germinate for the new season.
If you have never heard of it before, get ready to learn a strategy for seed success. Cold stratification, simply put, is exposing your seeds to cold and moist conditions, in order to help the seeds’ harder exteriors deteriorate in order to improve the germination process.
Cold stratification is a more modern technique that actually attempts to mimic something which happens in nature.
Botanists, through observation, realized that seeds which had fallen at the end of the season and then were covered by winter overground, or by a layer of snow, generally germinated much more easily.
In other words, cold stratification simply makes sure that your seeds germinate and have the best chance of surviving.
There are generally two approaches to cold stratification that will change depending on your own climate and temperature where you are growing the alliums.
If you are in the temperate northern hemisphere and commonly get cold winters with a chance of snow, you can actually allow the cold stratification to happen naturally.
If you get snow or a cold hard winter overground, then you should simply plant your seeds just before the cold front appears.
When the ground hardens with cold, or a layer of snow is present, the natural elements will break down the seed’s coat and once thawed will naturally have more success germinating when winter is over.
This is another good way to store seeds, with them being successfully stored in the ground itself, ready for the new season to emerge, you won’t have to do anything to make them stratify or germinate, so long as the conditions are right.
Yet, you can also get the same effect from stratifying your seeds by sowing them in a milk jug or something similar. To manually cold stratify indoors, you need to sow your seeds in some sort of moist medium such as peat, vermiculite, or even a moist paper towel.
A moist medium plus the cold temperatures we can achieve in a fridge, are ideal for cold stratification and can be as successful as natural cold stratification. This is a much better idea if you are in a climate where you won;t get snow or particularly cold temperatures outside.
When manually stratifying your seeds this way, they will need to be stratified for at least 30 days before being able to be germinated properly.
How To Germinate Allium Seeds
The next process of growing alliums from seeds is to germinate them, this occurs after cold stratification and if this latter stage is successful your seeds should germinate easily.
Assuming you followed the previous step of stratification, you will either have stratified your seeds in the ground, or you will have stratified them manually in your fridge.
If you are germinating seeds you think could be too old, or you aren’t sure if they work, place a few seeds on a moist paper towel that you mist for a week or two, and it should become clear if the seeds are good or not.
If they germinate they are good, if they don’t germinate they won’t work.
Should you have planted your seeds to cold stratify naturally in the ground, they should germinate naturally so long as you keep the soil moist and don’t let it get too cold, once the seeds thaw and they stratify they can’t really get cold again.
You will know you have had success as they begin to show sprouts.
Equally, even if you have stratified in your fridge manually, you could theoretically plant the seeds now, around the springtime, giving them around 12 weeks to germinate in the soil.
But if you want to keep manual germination going, so you can keep an eye on them better, we can manually germinate seeds as well.
If you plan on germinating the seeds manually, you could even do this on a paper towel that you mist, but can also be done in what is called a cell tray or a P9 tray, both designed for seedlings.
Equally, you could get a cardboard egg container and do the same thing. In any case you want to mist the seeds in the moist medium for around 12 weeks, making sure the seeds are covered by around an inch of soil and ensuring that the medium remains moist.
You don’t want to germinate your seeds in your fridge like last time but they should germinate best at room temperature.
The most important thing about germination is that your seeds require darkness to germinate. If you are doing this on the ground, obviously this is already done for you.
If you are germinating manually indoors, just make sure you cover your germinating seeds with something in order to make sure they are in a dark environment.
When growing manually indoors, you will know your seeds are germinated when they begin to show their first signs of sprouting, through either a root or a stem permeating the seed.
When growing naturally in the ground, provided your seeds are the recommended inch beneath the soil, they should begin to sprout out of the soil, and your job is done in this circumstance.
How To Plant Alliums Post-Germination?
So now you have germinated seeds. If you have gone through stratification and germination naturally in the ground, good job, your seeds are ready to grow. There should be sprouts coming out of the soil by early to mid spring.
If you are doing this manually and your seeds seem to have germinated, now is the time to either plant them in the ground or to pot them into something bigger.
From their plug size, the term that refers to seeds that germinated and started sprouting a little, you want to keep misting them and help them remain moist.
Once their sprouts are relatively well established it can be time to pot them into something bigger or in the ground. If you plant them in the ground from their plug size, they will naturally grow well.
You could even plant them next to the more well established and mature alliums already planted in your garden, and they will grow well.
If you choose to keep them in a polytunnel or greenhouse, you will want to pot them up into a pot size known as ‘P9’, which generally refers to a pot that is 9cm X 9cm (3.5inch X 3.5inch), and is commonly sold and used.
This is a good sized pot for a sproutling or seedling to grow further.
When Will My Alliums Bloom From Seedlings?
So, an allium is what is considered a perennial flowering plant in horticulture. This term, ‘perennial’, basically means that they will die off then come back each year, this is why we have their seeds which are dispersed naturally in this process unless we collect them as we have described.
This said, it means that your blooming process will happen over a much longer period of time, then say an ‘annual’ flowering plant which will flower in its first and only year of life and then die off, without spreading seeds.
Put simply, as a perennial plant, if you are growing an allium from seed each year it will continue to develop and grow larger with each season.
Put simply, your allium likely won’t bloom in its first seasonal cycle. Instead, we can expect to see your allium bloom in its second cycle, should you stratify and germinate your seeds correctly, while some of them may require another season in order to bloom fully.
Final Thoughts
As you can see, alliums are generally an easy plant to grow from seed. There is a simple four step process to grow an allium, or any plant, from seed. First collect seeds, put them through stratification, and then germinate, then sow and maintain.
Speaking specifically about alliums, they won’t bloom until around their second cycle and if you are looking for food produce this can take equally long.
In any case, going through stratification and germination are the two main key practices we should learn when growing any plant from seed, and they can also guarantee the highest chance of success for the plant as well as ensuring that blooming occurs as early as possible.
Get some allium seeds today, ask a neighbor, or go to the store, and you can easily start growing your alliums for the next season.
Hi, I am Diane Peirce, and I am one of the co-creators of MichWildflowers.com.
I love sharing my experiences with individuals in this community, and I enjoy sharing some of the best tips I have learned over the years caring for my own garden at home.
In my articles, you will find the best flowers, most fragrant flowers you can plant in your garden, how to care for your favorite plants, informative guides and how-tos so you can have the best backyard in town!


")
![How To Save Zinnia Seeds [Harvesting And Storage]](https://michwildflowers.com/wp-content/webp-express/webp-images/uploads/2023/05/How-To-Save-Zinnia-Seeds-Harvesting-And-Storage-150x150.jpg.webp "How To Save Zinnia Seeds [Harvesting And Storage]")


