Whether you’ve grown statice before, or this is your first ever time growing this gorgeous flower in your own backyard, you’ll soon discover just how easy it is not only to grow from the seed, but also to care for it too.
A particularly whimsical flower, statice makes for an excellent addition to any bouquet, and looks especially great when added to farmhouse bouquets.
This is because the stems of statice flowers tend to be both thick and long, which helps the structure of the bouquet itself, and their unusual looks help to diversify your bouquet from others.
Statice are an exceptionally attractive flower, especially since they’re available in a variety of different colors and tend to last a lot longer than some other flowers.
As a result, more and more people want to begin growing their own statice each year.
With this guide, we’ll provide you with all of the information you ought to know in order to grow your own statice flowers, starting with the seed, all the way until they bloom.
So, let’s get started with growing our own statice flowers!
What Are Statices?
Before we can begin to take a look at how you can grow your statice, it’s first important to understand more about statice as a plant, especially if it’s one that you’re unfamiliar with.
Knowing more about the plants you’re growing isn’t just helpful for understanding the basics of how to take care of them, it’s also really interesting.
A member of the Plumbaginaceae family, and one of the 120 members of the Limonium genus, statice, which is the common name for Limonium sinuatum, is also referred to by a variety of other names.
Some of these other names include things such as: “sea lavender”, “wavyleaf sea lavender”, or even “marsh rosemary”.
Despite these names, statice has absolutely no relation to rosemary whatsoever, and this tends to confuse a lot of people who are unfamiliar with the species.
Statice was originally native to the Mediterranean, which is exactly why it is a plant that is so fond of heat and the sun.
Now, let’s take a closer look at each of the sections of the statice plant!
Statice Flower
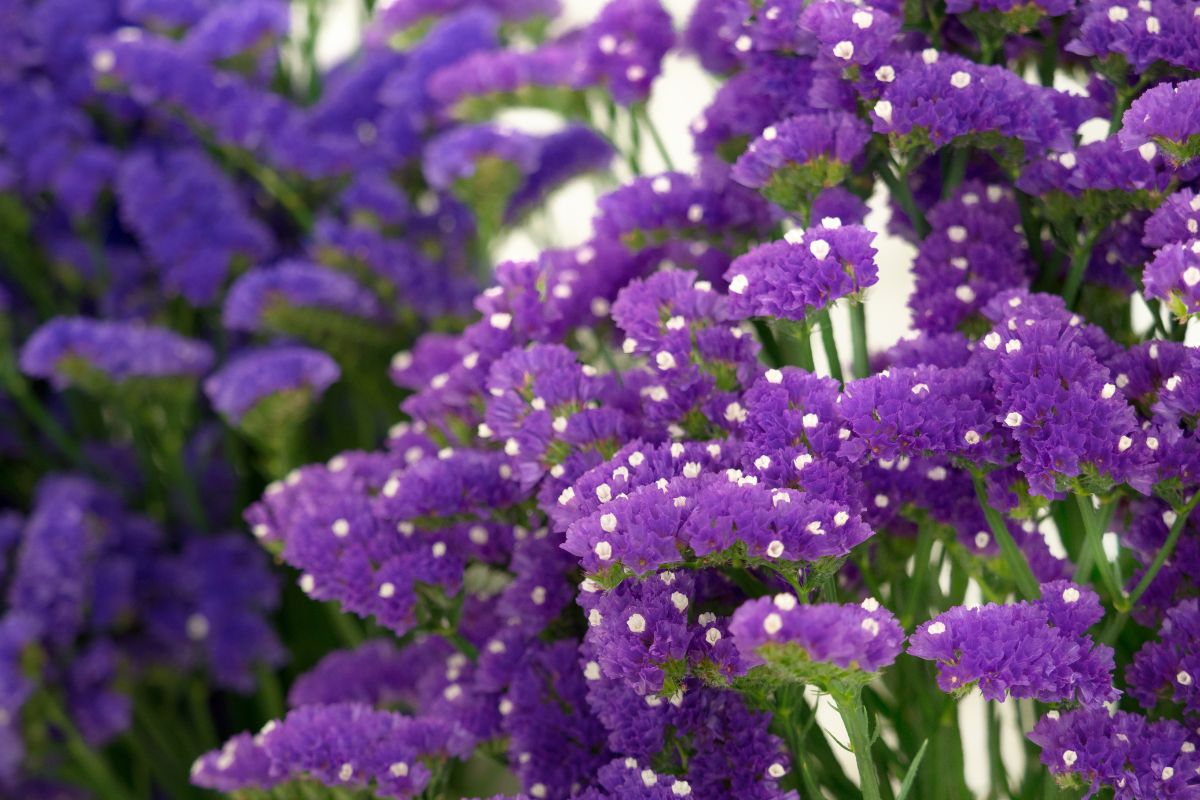
One of the most notable things about the flower of the statice is the texture, which is often described as paper-like, and this texture is even more noticeable once the flowers have been dried out.
People often grow statice to add to bouquets not just because of their pronounced and unique texture, but also because they’re available in a variety of different colors, which makes them good for adding a touch of color to different bouquets.
The colors available are typically blue, apricot, pink, purple, white, and yellow. Although the shades can vary.
The blooms of a statice will tend to form towards the top of the stems, and will then grow on the upward facing branches.
The shape of the bunches that statice forms are also particularly interesting, as they’ll often form in wedge-shaped or wing-shaped bunches right at the tip of each branch.
Not only will these include the beautiful colored calyxes, but sometimes also tiny white blooms.
Harvesting statice has to be done only once the plant has bloomed, doing it prior to this risks wilting.
Statice Stems
The stems of the statice are particularly interesting, and with their native habitat being the Mediterranean, they also tend to resemble a number of other plants that can be found close to the seaside.
Their stems are characterized by their stiffness, as well as the ridges found running right along the outer surface of the stem itself.
Typically, the stem of a statice will tend to have somewhere between three and four ridges on its outer surface.
To the touch, these ridges are often described as being like folded paper. But this isn’t the only thing on the outside of the stem, as the stem will have super small hairs too.
On one statice plant, there can be multiple different stems, all of them growing from the rosette base of the statice plant, and they’ll also tend to grow at different rates, meaning that it’s not uncommon to see a number of stems at differing stages of development.
Each of these stems will then produce a number of branches, each with its own blooms at the end of them.
Statice Leaves
If you thought the flower and the stems of the statice were all that was unique about this plant then think again, as the leaves also have their own intricate details that are fascinating to learn more about.
The statice leaves found adorning the stems of the plant are notably flat, with a pointed tip, and will typically grow in an upward direction, all of the way up until the bloom at the top of the branch.
The leaves on the stems aren’t the only leaves on the plant though, as the base of the rosette plant will also grow its own leaves.
These leaves differ from those found on the stems, and have a different formation too.
If you’re growing your own statice, you’ll be able to notice this difference even when the plant is a mere seedling, and as the plant becomes more established, the formation will widen even more.
These leaves are likened to the spokes of a wheel in the way in which they protrude from the plant, and also have slightly wavy edges too, which is why they’re also referred to as the “wavy leaf sea lavender”.
Statice Seeds
The final part of the plant to be acquainted with are the seeds themselves.
The seeds of the statice plant tend to be brown in color, with an oblong shape. As a result, some people tend to say that the seeds of this plant look like little rice grains.
The likeness is definitely there, however, statice plant seeds are actually much smaller than grains of rice are, with the average length of a statice seed usually being around half a centimeter.
How To Grow Statice
Growing a new plant species can always be slightly daunting, even if you’re quite an avid gardener. Thankfully, no matter what amount of experience you have with planting, statice is an especially easy plant to grow.
Statice tends to be a short-lived perennial plant when grown in warmer locations, but they’re commonly planted as annual flowers.
Statice will tend to bloom the year it is planted, with the blooming cycle coming to a close as the first frost of the year begins to set in.
For the best results, it’s best to start the seeds of your flowers indoors either in the late winter or the early spring, as this will help to ensure that you give them something of a headstart on the growing season.
As a general rule, if you’re planning on growing your seeds indoors, then you should plant them between six to eight weeks before the last of the frost in the spring.
Alternatively, you could winter sow instead, which allows you to begin the seeds as early as January, leaving them outdoors in containers.
The seeds will then begin to germinate once the time is right based on the zone they’re being grown in.
With all of this in mind, let’s begin to look at how to grow your statice!
Planting Your Statice
Although you can opt for the winter sowing method, this guide will focus on the method of planting indoors during the winter months, allowing you to get ahead ready for the growing season.
To begin planting your seeds, you’ll want to find a suitable container in which you can plant your seeds in. We’d definitely recommend cell trays for this, with either a 72 or 124-cell tray being perfect for this.
With your tray ready, add your starting medium, and then add a small indent into the center of each of the medium-filled cells, a pencil eraser or even a finger should be the perfect size.
You’ll then want to drop one or two seeds into each indentation, and then lightly cover the seed with either vermiculite or just some of the starting medium.
Vermiculite is definitely preferential as it does a much better job of keeping the seeds moist, and also helps to prevent the soil from drying out too.
Statice is also one of those plants that tends to benefit from a spot of light during the germination process, which is why you should ensure that the layer of medium or vermiculite on top is kept thin.
When it comes to watering your seeds, you should only opt for a bottom watering method. So, once you’ve planted all of your seeds, you can bottom water your seeds by placing your cell tray into a larger, shallow tray of water.
You should ensure that you’re keeping the soil moist throughout the germination process, so be sure to keep a close eye on the soil throughout.
Some people tend to use a heat mat in order to help the germination process, and will place the germinating seeds over the mat until they are around 60% germinated.
With most of the seeds germinated, you can then place them under grow lights, which will help with their light requirements until they’re able to be moved outside.
Overall, the germination process can take anywhere from three weeks to thirty days.
Moving Your Statice Outside
As the last frost of spring draws closer, it’s a good time to begin to prepare your germinated seedlings ready for their move to the outdoors.
Hardening Off is the name of the process, and is a way of helping the seedlings to acclimatize to their new environment. Simply begin placing your seedlings outside for a couple of hours on the first day in a protected area.
You’ll need to increase the amount of exposure time the seedlings have each day. For example, on the second day, you’ll want to double the seedling’s exposure time, and increase it by several hours on the third day.
Eventually you’ll be leaving your seedlings outside overnight, but be sure that the weather remains mild, as they’ll die if it’s too cold or too hot.
Gradually increasing the exposure your seedlings have will help them to become used to the environment in which they will eventually be planted in.
It’s important to ensure that their exposure location isn’t being encroached by too much sunlight, as the seedlings won’t be able to handle it too soon, and will likely dry and die out.
Once you’ve allowed your seedlings to harden off for around seven to ten days, your seedlings should now be ready to be planted.
While statice is an annual plant, and can be planted in any of the outdoor zones during the warmer summer months, because it hails from the Mediterranean, it’s a good idea to ensure that it is planted in a place that is provided with plenty of heat and light from the sun.
You’ll also need to ensure that the soil your statice is planted in is both fertile and well-drained, with clay soil often being a popular choice.
Due to its native habitat, statice tends to be rather hardy when it comes to a lack of water, and will usually require no more than what they get from the natural elements.
However if you notice the soil is especially dry, then a small amount of water might be necessary, but this all depends on the climate where you live.
Many first-time statice growers might be surprised at the speed in which statice grows. During the growing season, it will only take somewhere between eight to ten weeks in order for it to begin blooming.
Each bloom will last a while too, allowing you plenty of time to appreciate the gorgeous sight of your statice!
Statice will also produce stems from the basal rosette right way through the summer, as it regrows from the base itself.
The stems of the statice can all have different stages of development, so the blooms on each stem will also vary in maturity too.
As a “cut and come again” flower, the more you cut, the more it will bloom. Pruning statice is particularly easy, as all you need to do is cut the stems right at the base of the rosette leaves.
If more convenient, then it’s also possible to grow your statice in pots instead.
Of course, you won’t be able to use just any pot, so you’ll need to make sure that whatever pot you plan on using is a decent size with enough growing room for your plant.
The rosette of a statice plant can be around twelve inches in diameter, so it’s important to ensure that your pot is able to fit a statice in.
Of course, plants are also great at adapting to the area they’re being grown in, so a decently sized pot should be able to grow multiple statice plants inside.
It’s also worth noting that statice don’t benefit from pinching in any way whatsoever, so you should avoid pinching your statice when growing them.
Typically, some flowering plants require pinching, which helps to promote the growth of side shoots, but since statice naturally have side shoots that grow well already, there’s no need to pinch them.
In fact, there’s a good chance that pinching your statice will ultimately cause more issues, and will likely cause some sort of deformity with your statice plant.
For those who are new to growing statice, you’re probably wondering how tall the plants can get, but there’s no one definite answer to this question, since it all depends on the variety of statice, as well as a number of different factors during the germination and growing process.
Typically, most varieties of statice will be able to reach around sixty centimeters tall, so it’s safe to say that they can be quite tall for flowering plants!
Harvesting Your Statice
As easy as the growing process for statice is, the harvesting process is similarly easy. If you’re looking to grow statice to use in bouquets, then knowing how and when to harvest your statice is extremely important.
Before you harvest, you need to ensure that the blooms have opened fully, which will help to prevent any wilting.
You should also ensure that any cut you make is done as deep into the base as possible, which helps to promote new growth on the plant.
You can begin to harvest your statice when the white petals have become visible on the bloom itself, as this is evidence that the blooms have reached maturity, and will therefore lower the risk of wilting.
Statice As Cut Flowers
Their most common use, and probably the reason why you’re growing your own statice is because of their popularity as cut flowers.
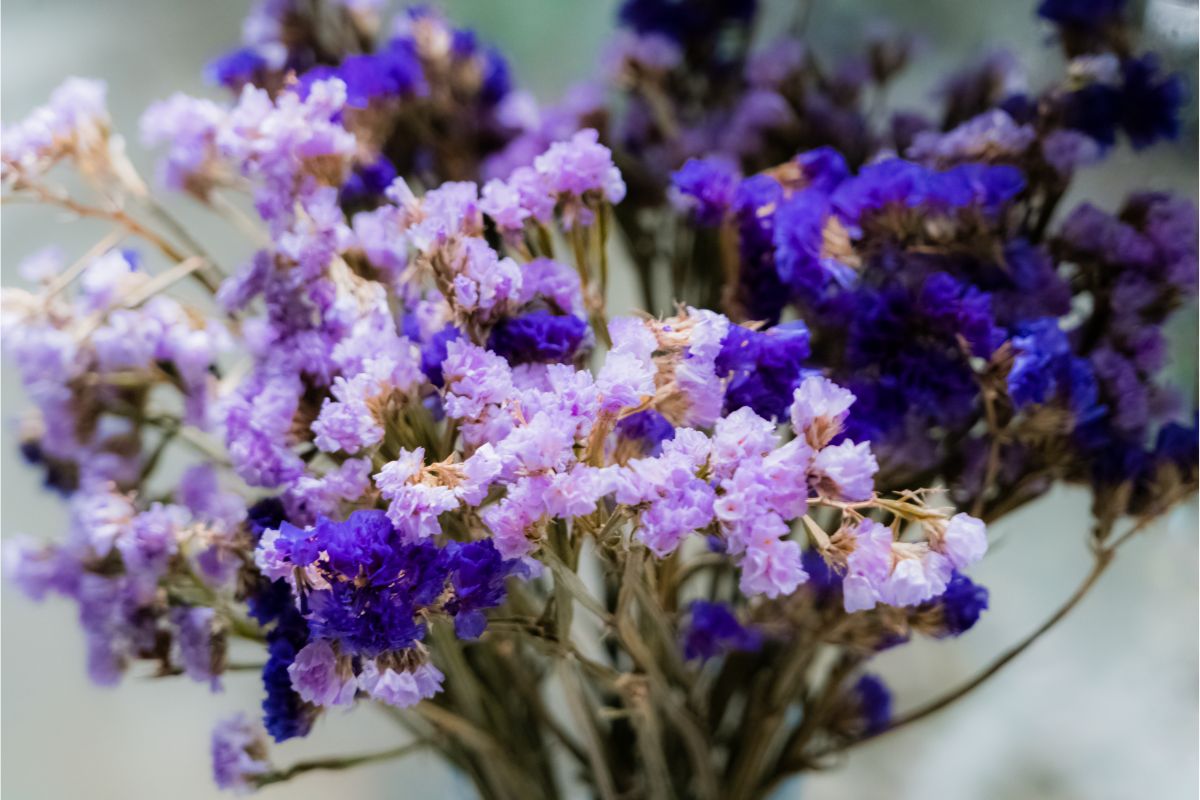
Whether fresh or dried, statice make for a wonderful sight, either by themselves, or as a bouquet with other flowers.
If you’re going to be placing your statice in a vase fresh, then you’ll need to know how to strip away the lower leaves, as this will help to keep your statice alive for longer, and will help to prevent any wilting too.
To do this, carefully use a sharp blade to remove the leaves along the stem itself.
Compared to other flowering plants, statice tend to have a lot less leaves along the stem, but it’s still worth cutting them off before placing them in water.
You can then place these cut stems into water, or a holding solution, and keep them in a well-shaded location, which then makes them perfect for conditioning.
If you’ve had statice as part of a bouquet before, then you might be aware already, but the blooms have a particularly long vase life, with an average lifespan of around two weeks after being cut.
As a result, these blooms are usually the last of a bouquet to be alive.
Drying Your Statice
If you’re looking for a longer-lasting arrangement, then you can always dry out your statice instead.
Thankfully, statice is as easy to dry as it is to grow, so you should have no trouble doing this, even if it’s your first ever time drying out flowers.
If you’re looking to dry your statice, then you need to cut the plant once the blooms have fully opened and matured, which you’ll be able to tell from the white petals on the bloom.
You’ll then need to dry your statice as soon as it’s been cut, with the blooms at their most fresh, as this will lead to the best results.
When it comes to drying your statice, you can choose from a number of different methods, but the method we’re going to explain here is most definitely going to lead to the best results.
The first method for drying your statice is to dry it upside down in a dark place.
All you’ll need to do is bunch a few of the stems together using an elastic band toward the bottom of the stem, and then allow them to air dry in a suitable location for up to seven weeks.
It’s important to use an elastic band for this, as they’ll shrink in size as they dry, and you won’t want any of your stems falling onto the floor.
You’ll also want to ensure whatever location you choose is a place where you can secure your bouquets with enough airflow between them.
It’s definitely best to use a wire or washing line for this method, as you’ll be able to use clothing pins to hold the bouquets by the elastic bands.
Depending on the space you have, you might only be able to do a few bouquets at any one time, so you might want to consider this before you cut your statice.
Alternatively, you can dry out your statice using a vase too. Simply add your statice to a vase with water about seven inches deep, and then once the water has dried out, simply don’t add any more water.
From there, your statice should be able to dry out nicely, but this method will also take around several weeks.
Final Thoughts
We hope that you’ve enjoyed our guide to how you can grow your own statice plants at home, starting right from the beginning with your seeds, all the way until they bloom, and then it’s time to cut them ready for use in vases or bouquets.
Thankfully, statice is definitely one of the easier plants to grow and care for, so even if it’s your first season growing flowers, you should have no issues with doing so, especially with this comprehensive guide.
You can even take some of the tips for growing statice and apply them elsewhere, especially with things such as hardening off, which should ideally be done with any seeds that you plan on transplanting to the outside.
The more you grow, the more you’ll learn, so don’t be afraid of things going wrong. Good luck!
Hi, I am Diane Peirce, and I am one of the co-creators of MichWildflowers.com.
I love sharing my experiences with individuals in this community, and I enjoy sharing some of the best tips I have learned over the years caring for my own garden at home.
In my articles, you will find the best flowers, most fragrant flowers you can plant in your garden, how to care for your favorite plants, informative guides and how-tos so you can have the best backyard in town!


")


